What is constraint layout?
ConstraintLayout is a view group that facilitates the creation of flat UI hierarchies and complex layouts that intuitively adapt to different screen sizes and changing device orientations for the complex layout, allowing developers the luxury of speed. It was created to help reduce nested views and improve the performance of layout files. It was released at Google I/O 2016 and is compatible down to API level 9 (Gingerbread).
There are many advantages of using constraintLayout. It bears some similarity to RelativeLayout in terms of laying out all views in accordance with the relationships between parent layout and sibling views, yet it’s a lot more flexible and works better with Android Studio’s Layout Editor. And the one advantage that most people overlook is that you can even perform animations on your ConstraintLayout views with very little code.
Using ConstraintLayout In Your Project
ConstraintLayout is available as a separate support library, which is great because this way, any update in the future would be compatible with all versions of Android. As of right now, the latest version supported is 1.1.0-beta4. Key changes this version includes are
- Fixes RTL issues (guideline, chains, bias)
- Fixes missing percent handling in ConstraintSet
- Fixes various barriers issues
- Improved XML inflation speed
To get started with your project, first make sure that ConstraintLayout for Android and Solver for ConstraintLayout support repositories are installed. Now add the ConstraintLayout library as a dependency in your build.gradle file:
dependencies {
    compile 'com.android.support.constraint:constraint-layout:1.1.0-beta4'
}
There are two ways to get started with using ConstraintLayout in your layouts. Either you can create a new layout with the Root Tag Value of android.support.constraint.ConstraintLayout or simply right-click on the ViewGroup you’d like to convert in your existing layout.
Using Auto-Connect and Infer Constraint
Enabling auto-connect will automatically add a constraint to the view based on its position and views around it.
Just as there are two sides of a coin, auto-connect too has its advantages and disadvantages.It can make developing UI easier and faster but at the same time if the auto-connect constraints don’t fulfill your requirements then you will have to make extra efforts edit them to meet your requirements.
Infer constraint comes into play when you want to create overall constraints to all the views in a layout. When you click the infer constraint icon it will add constraints according to the position of the view in the layout.
Inspector Pane
Constraint Layout provides inspector pane to provide more ease and efficient UI designing.
You will find inspector pane on the right hand side of the layout builder and it lists various properties of the selected widget.
Following are the important and commonly used features of constraint layout :-
1. Bias – bias allows us to move certain component towards a certain direction.Horizontal Bias allows us to move components horizontally whereas the Vertical Bias allows vertical movement.
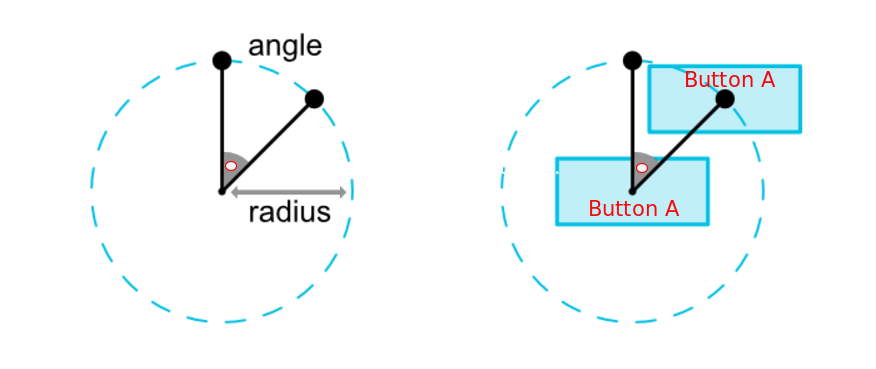
2. Circular Positioning – You can constrain a component’s center relative to another component’s center, at a particular angle and distance, thereby allowing you to place the components in a circular path.
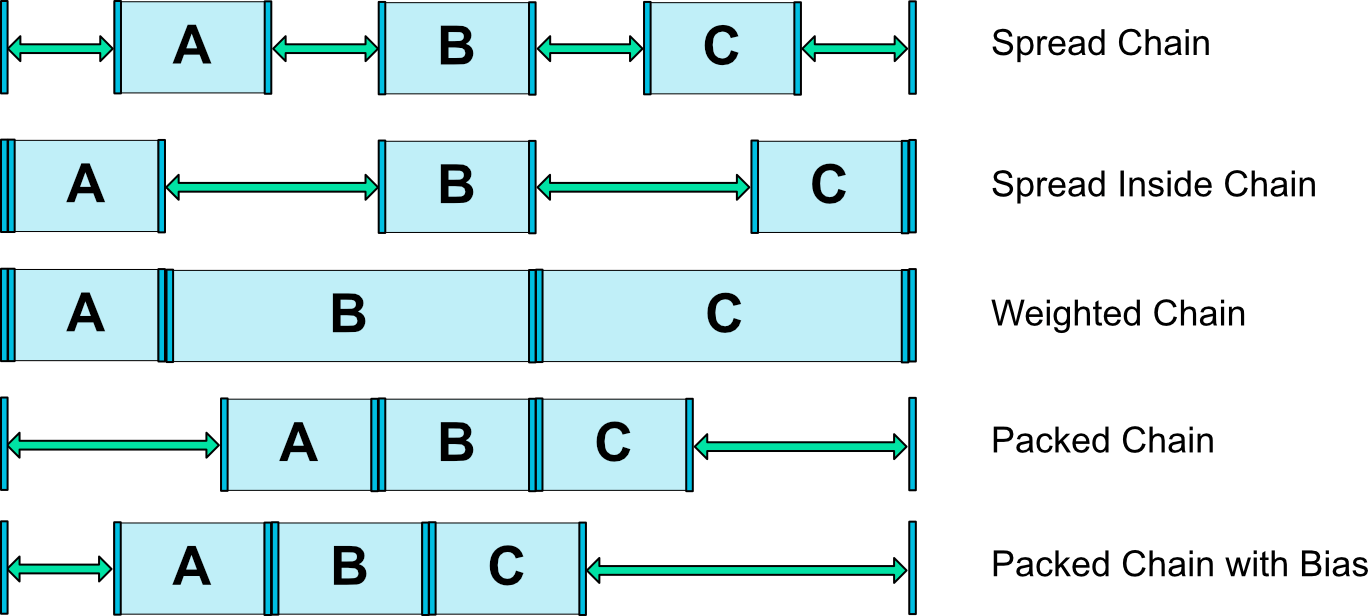
3. Chains – There are 4 types of chain styles – Spread, Weighted, Spread Inside and Packed
- Spread – the components of the respective chain will spread out.this chain style is the default style.
- Weighted – the components of the chain are set to MATCH_CONSTRAINT and they will occupy the available space if weight properties are not set for the chain widgets.
- Spread Inside – the widgets at the starting and ending of the chain will align to the parent and the rest will occupy the space equally.
- Packed – the chain components will be packed together.You can also adjust the bias of the packed chain using horizontal or vertical bias.
4. Virtual Helper Objects – ConstraintLayout also provides us with some virtual helpers which are not seen on the layout but helps in making UI neat and organised. These are –
- Guidelines – These allow the constraint to attach to them and align them in the required manner.A guideline may be vertical or horizontal depending upon the requirement.
- Barriers – These are used to align elements which dynamically vary their size.
- Group – Grouping in constraintLayout refers to reference of view ids and not nesting of views. Grouping of views can be used to set the visibility of group components.
Conclusion
To sum up, ConstraintLayout is a faster, better and much more efficient alternative to designing large and aesthetic layouts in your Android UI. Now that you are acquainted with the basics of ConstraintLayout, you can begin experimenting with it and get a feel of how much easier it makes your job. Do share your experiences, questions and ideas with us, and have fun designing.