With the new Android Nougat update, Google has introduced a number of interesting features like Multi-Window Support, Direct Reply from Notification, Quick Settings Tile API, VR Support, and Image Keyboard Support. Among all these features, we will shed light on App Shortcuts.
App Shortcuts were introduced in Android 7.1 (API level 25). App Shortcuts allow users to perform multiple actions within a short period of time with relatively less effort. Shortcuts let users quickly start common or recommended tasks within your app.
You can have a maximum of five Shortcuts at a time for your application.
Users want to finish tasks in as few clicks as possible with minimal navigation. That’s exactly what App Shortcuts let us do. Some of the tasks that can be easily performed with App Shortcuts are:
1) Opening your company website
2) Replying to the conversation you had previously
3) Playing/Pausing the media your app is playing currently
4) Logging out of the application
Two types of App Shortcuts are available:
Static: This cannot be changed until you make a change in the file and re-install it on a device.
Dynamic: This can be changed during runtime also. You can make a change without re-installing it on the device.
By defining your common tasks into shortcuts, you can allow users to perform those action without spending much time navigating through various screens.
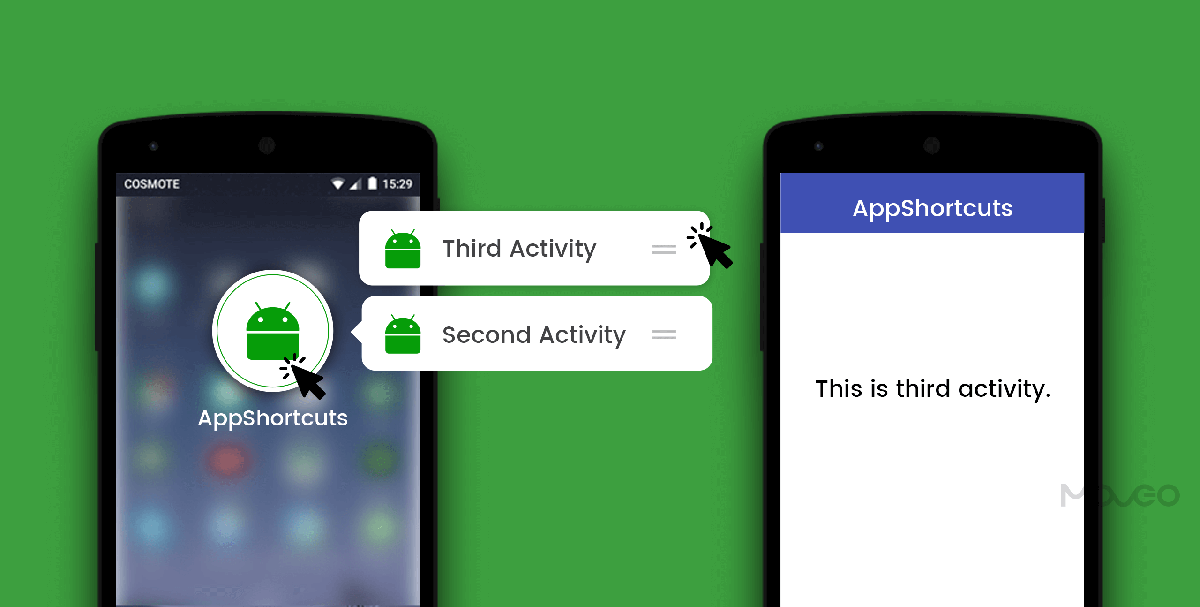
App Shortcuts can be launched by long-pressing on Application icon.
Static Shortcuts
Using static shortcuts in an application is very simple. Let’s see how your coding will be affected.
Define following meta-data tag in your AndroidManifest.xml
<application ...>
 ...
 <activity>
 </activity>
 …
 …

 <meta-data
 android:name="android.app.shortcuts"
 android:resource="@xml/shortcuts" />
</application>
Here, android:resource will the source of your shortcuts. Create shortcuts.xml file under res/xml folder. Here, you can define all your static shortcuts.
<?xml version="1.0" encoding="utf-8"?>
<shortcuts xmlns:android="http://schemas.android.com/apk/res/android">
 <shortcut
 android:icon="@mipmap/ic_launcher"
 android:enabled="true"
 android:shortcutDisabledMessage="@string/disabled_message_text"
 android:shortcutLongLabel="@string/shortcut_long_text"
 android:shortcutShortLabel="@string/shortcut_short_text">

 <intent
 android:action="android.intent.action.VIEW"
 android:targetClass="<applicationId>.SecondActivity"
 android:targetPackage="<applicationId>" />

 </shortcut>
</shortcuts>
As you can see, the root element is <shortcuts>, inside which you can define multiple shortcuts using <shortcut> tag.
Properties used with <shortcut> tag:
Icon: It will be shown as an image on the left side of the shortcut.
Enabled: It indicates whether or not shortcut will be enabled. If enabled = “false”, it won’t be shown when user long-presses on the Application icon.
ShortcutDisabledMessage: A string shown to users if they try to launch a disabled shortcut pinned to their home screen.
ShortcutLongLabel: This text will be shown if shortcut launcher gets enough space.
ShortcutShortLabel: This is a mandatory field. This text will be shown to most users when they see your shortcut on launcher.
Intent: Define an intent which will be launched when users click on any shortcut.
Note: Don’t forget to mention your applicationId in android:targetClass and android:targetPackage, otherwise you may get App isn’t installed error.
The output of the above code will be as follows:

It looks very simple, but did you notice one thing? Upon pressing the ‘Back’ button on the application launched, it closes the app and shows the home screen. This doesn’t seem correct. Instead, users should be moved to the main screen of application.
To do this, you need to add one more intent inside <shortcut> tag and you are done.
<shortcut
 ...

 <intent
 android:action="android.intent.action.MAIN"
 android:targetClass="<applicationId>.MainActivity"
 android:targetPackage="<applicationId>" />

 <intent
 android:action="android.intent.action.VIEW"
 android:targetClass="<applicationId>.SecondActivity"
 android:targetPackage="<applicationId>" />

 </shortcut>
Make sure you add android:action=”android.intent.action.MAIN” inside <intent> for your main screen. Now every time users press ‘Back’ from SecondActivity, he/she will be moved to the MainActivity.
That’s all there is about static shortcuts. Isn’t that simple? Now let’s move on to dynamic shortcuts.
Dynamic Shortcuts
Dynamic shortcuts allow users to define shortcuts during runtime. Behaviour of each shortcut will be defined programmatically. This means we don’t need any kind of shortcuts.xml
ShortcutManager is used to manage all the dynamic Shortcuts. ShortcutInfo represents single shortcut, which will then be added to ShortcutManager via ShortcutInfo.Builder.
Let’s consider a sample code to get a better idea.
ShortcutManager shortcutManager = getSystemService(ShortcutManager.class);

Intent thirdIntent = new Intent(this,ThirdActivity.class);
thirdIntent.setAction(Intent.ACTION_VIEW);

ShortcutInfo thirdScreenShortcut = new ShortcutInfo.Builder(this, "shortcut_third")
 .setShortLabel("Third Activity")
 .setLongLabel("This is long description for Third Activity")
 .setIcon(Icon.createWithResource(this, R.mipmap.ic_launcher))
 .setIntent(thirdIntent)
 .build();
 shortcutManager.setDynamicShortcuts(Collections.singletonList(thirdScreenShortcut));
All the methods remain the same as static shortcuts. The only change that can be seen is in the ID. Shortcut ID will be given in ShortcutInfo.Builder(). As you can see here, we have used shortcut_third as an ID of the shortcut.
Once you are done with setting all the properties of shortcut using ShortcutInfo.Builder(), we will add that in ShortcutManager as a list using setDynamicShortcuts().
Now let’s see how to create back stack for dynamic shortcuts. It is almost the same as what we have done in static shortcuts.
Intent thirdIntent = new Intent(this, ThirdActivity.class);
thirdIntent.setAction(Intent.ACTION_VIEW);

ShortcutInfo thirdScreenShortcut = new ShortcutInfo.Builder(this, "shortcut_third")
 .setShortLabel("Third Activity")
 .setLongLabel("This is long description for Third Activity")
 .setIcon(Icon.createWithResource(this, R.mipmap.ic_launcher))
 .setIntents(new Intent[]{
 new Intent(Intent.ACTION_MAIN, Uri.EMPTY, this, MainActivity.class).setFlags(Intent.FLAG_ACTIVITY_CLEAR_TASK),
 thirdIntent
 })
 .build();
You only need to add one more Intent with the reference of MainActivity or your home activity. Every time users open the shortcut and press the ‘Back’ button, MainActivity will be opened instead of directly moving to home screen.
As the name suggests, it is dynamic; so there should be a way to perform certain operations at runtime too. Let us see a few of them.
Update Shortcut Text at Runtime
We can change/update the name of shortcuts according to our needs. We need to use ShortcutInfo object and updateShortcuts() of ShortcutManager.
findViewById(R.id.btnChnageText).setOnClickListener(new View.OnClickListener() {
 @Override
 public void onClick(View v) {
 ShortcutInfo thirdShortcut = new ShortcutInfo.Builder(MainActivity.this, "shortcut_third")
 .setShortLabel("Changed Third Activity")
 .build();

 shortcutManager.updateShortcuts(Arrays.asList(thirdShortcut));
 }
 });
Here, we are updating the text of “Third Activity” to “Changed Third Activity”. In order to perform this action, we need to reference the shortcut we created earlier. We will get ShortcutInfo object by using shortcut ID. In our case, it will be “shortcut_third”.
To update in ShortcutManager, we need to use updateShortcuts() which will update all the given shortcuts. It accepts the list of ShortcutInfo.
Output will be as follows:

Update Shortcut Order at Runtime
We need to use setRank() method in order to change the display order of all the shortcuts.
To understand this scenario, we have created one more dynamic shortcut with ID “shortcut_four”
ShortcutInfo thirdShortcut = new ShortcutInfo.Builder(MainActivity.this, "shortcut_third")
 .setRank(2)
 .build();

 ShortcutInfo fourthShortcut = new ShortcutInfo.Builder(MainActivity.this, "shortcut_four")
 .setRank(1)
 .build();

 shortcutManager.updateShortcuts(Arrays.asList(thirdShortcut,fourthShortcut));
setRank() will accept non-negative value. The shortcut that has the higher value will be displayed on top. In the above code, we can see that the third shortcut has the higher value, so it is displayed on top after updating it.
So, that is all about App Shortcuts. If you have done something interesting with App Shortcuts, do share it with us so that other people can also know about it.
Happy coding!