
For a long time now, Java has been the official language for developing Android applications and we have been using Data Binding Library to bind application logic and layouts. Data binding offers flexibility as well as broad compatibility to your code.
It’s a library that allows you to bind the data of your models directly to the xml views in a very flexible way.
Kotlin was recently introduced as a secondary ‘official’ Java language. It is similar to Java in many ways but is a little easier to learn and get to grips with. Some of the biggest companies have adopted Kotlin and seen amazing results.
- Pinterest, with its 150 million subscribers has successfully adopted Kotlin.
- Basecamp says that they have seen a massive improvement in speed, performance and developer happiness after making their Android app 100% Kotlin.
So now, developers who have worked with both Java and Data binding library have a few doubts about whether Kotlin supports Data Binding Library or not? So the answer is YES, Kotlin very much supports Data Binding Library. We can still bind our layouts with the Kotlin class.
In this post, we will learn Kotlin with data binding in Android. It gives you the ability to communicate between your view and model. It keeps the code clean and sorted.
I will show you the approach I used to mix the power of Data Binding with Kotlin with a simple example.
If you want to use data binding and Kotlin, here are a few things to keep in mind:
- Data binding is a support library, so it can be used with all Android platform versions all the way back to Android 2.1 (API level 7+).
- To use data binding, you need Android Plugin for Gradle 1.5.0-alpha1 or higher. You can see here how to update the Android Plugin for Gradle.
First of all, create an Android Studio project and add a dependency for Kotlin and few changes for your Project level build.gradle
buildscript {
ext.kotlin_version = '1.2.10'
ext.gradle_version = '3.0.1'


dependencies {
	classpath "com.android.tools.build:gradle:$gradle_version"
	classpath "org.jetbrains.kotlin:kotlin-gradle-plugin:$kotlin_version"
	classpath "org.jetbrains.kotlin:kotlin-android-extensions:$kotlin_version"

	}
}
We also need to add the Data Binding dependency and the ones of Kotlin to the build.gradle file of our app.
apply plugin: 'kotlin-android'
apply plugin: 'kotlin-kapt'

android {
    ....
    dataBinding {
        enabled = true
    }
}
dependencies {
    ...
    kapt "com.android.databinding:compiler:$gradle_version"
}
//Notice that I made the compiler version a variable in the project level build gradle so it can be managed from a single place
That’s all the configuration we need to start using Data Binding with Kotlin.
Now for Kotlin and Data Binding to work together, add a Kotlin Model Class. This model class is going to bind your layout with your Kotlin activity class.
I have created UserModel.kt class :
package com.ktdemo

/*
* Created By Androidian on 29/12/17
*/
class UserModel {

    lateinit var uName : String

    lateinit var pwd : String

}
Now we use UserModel.kt model with our layout activity_main.xml
<?xml version="1.0" encoding="utf-8"?>

<layout xmlns:android="http://schemas.android.com/apk/res/android"
    xmlns:app="http://schemas.android.com/apk/res-auto">

    <data>

        <variable
            name="userModel"
            type="com.ktdemo.UserModel" />
    </data>

    <android.support.constraint.ConstraintLayout
        android:layout_width="match_parent"
        android:layout_height="match_parent"
        android:padding="8dp">

        <EditText
            android:id="@+id/edtUserName"
            android:layout_width="match_parent"
            android:layout_height="wrap_content"
            android:layout_marginBottom="8dp"
            android:layout_marginTop="8dp"
            android:hint="User Name"
            android:inputType="textPersonName"
            android:text="@={userModel.UName}"
            app:layout_constraintBottom_toBottomOf="parent"
            app:layout_constraintEnd_toEndOf="parent"
            app:layout_constraintStart_toStartOf="parent"
            app:layout_constraintTop_toTopOf="parent"
            app:layout_constraintVertical_bias="0.4" />

        <EditText
            android:id="@+id/edtPassword"
            android:layout_width="match_parent"
            android:layout_height="wrap_content"
            android:layout_marginTop="8dp"
            android:hint="Password"
            android:inputType="textPassword"
            android:text="@={userModel.pwd}"
            app:layout_constraintEnd_toEndOf="parent"
            app:layout_constraintStart_toStartOf="parent"
            app:layout_constraintTop_toBottomOf="@+id/edtUserName"/>
    </android.support.constraint.ConstraintLayout>

</layout>
Now it’s time to bind your MainActivity.kt class with your layout activity_main.xml using UserModel.kt model.
package com.ktdemo

import android.databinding.DataBindingUtil
import android.support.v7.app.AppCompatActivity
import android.os.Bundle
import com.ktdemo.databinding.ActivityMainBinding

class MainActivity : AppCompatActivity() {

    lateinit var mainBinding : ActivityMainBinding

    override fun onCreate(savedInstanceState: Bundle?) {
        super.onCreate(savedInstanceState)
        mainBinding = DataBindingUtil.setContentView(this, R.layout.activity_main)
        var userModel = UserModel()
        userModel.uName = "Androidian"
        userModel.pwd = "123456"
        mainBinding.userModel = userModel
    }
}
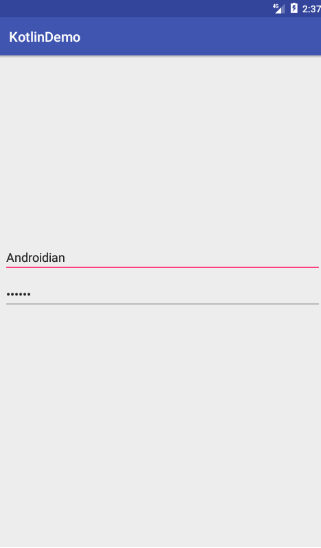
Time to test it. Run it and you should see an output like this:
Output
Conclusion
Kotlin happens to be a great language for coding Android apps and it has been widely appreciated by developers worldwide. So if you have been wanting to get started with it but were apprehensive about it’s Data Binding support, this post should have dispelled your doubts. Go ahead, try Kotlin today and do share your experiences with me. Happy coding everyone!

thanks
And where is ActivityMainBinding class which is the most crucial part of binding process?
A field called mainBinding is declared of type ActivityMainBinding. Are you talking about this ?
thanks man, nice and clean