Chatbots have been around for a while but only now is this simple yet powerful technology receiving the kind of attention it deserves. A chatbot is a computer program designed to facilitate conversations between a human and a computer. The technology has immense potential in app development, retail, customer service and various other areas.
Currently, chatbots are commonly used in instant messaging platforms such as Facebook Messenger, Wechat and Hike. Some companies even deploy bots on their website or app for customer support and feedback. Bots have also been integrated into toys and other modes of entertainment.
One of the most popular platforms which is used for making chatbots is Dialogflow.
What is Dialogflow?
- Dialogflow, formerly known as a Api.ai or Speaktoit, is a company that develops human-computer interaction technologies that are based on natural language processing.
- This technology understands the human input, matches and correlates the keywords, and converts it into machine language to be understood by the computer.
- It provides an effective alternative to on-phone or direct conversations by created automated-response text conversations.
- Dialogflow effectively works on various platforms like Google Assistant, Facebook Messenger, Slack, Skype, Twitter, Viber etc. allowing you to build just one bot that can be deployed on multiple platforms.
Link: https://console.dialogflow.com/api-client/#/login
So now that you have an idea of just how amazing this technology can be for your business, you probably can’t wait to get started on your own chatbot. Well, to help you do just that, lets take a look at how to proceed with building your first Dialogflow chatbot:
Build your first Agent
- Firstly, you need to have a Dialogflow account. You can sign up from the above link. If you already have an account, just login right here.
- Create a new agent on the Dialogflow Console by clicking on ‘Create Agent’. Enter your agent name and select DEFAULT LANGUAGE & DEFAULT TIME ZONE.

- Click on the CREATE button. This is the screen you will see upon creating.
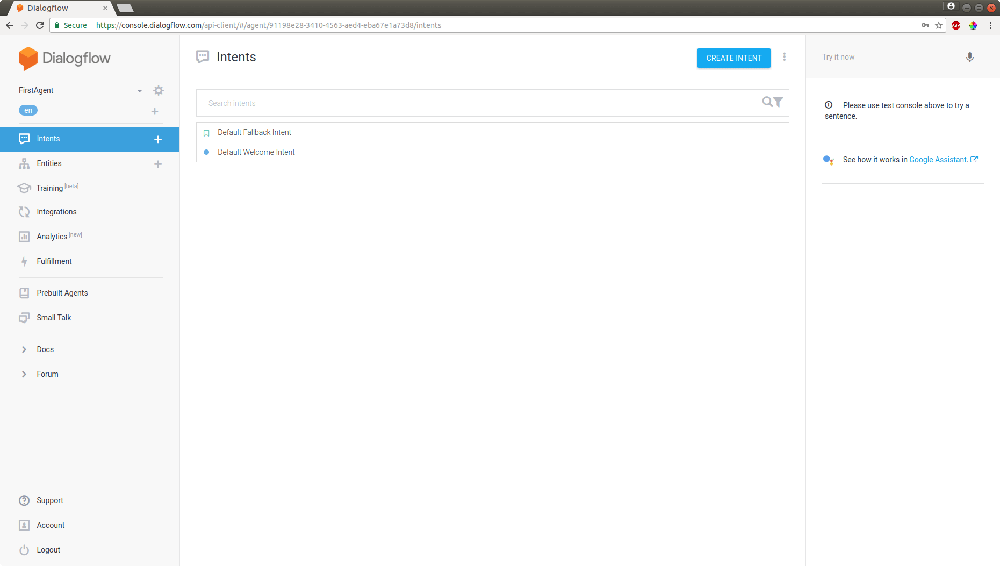
In the menu on the left side, you will see the different components of the Dialogflow.
Intent
An intent maps what the user inputs and determines what action needs to be taken by the agent.
There are two default intents:
- Default Welcome Intent
- Default Fallback Intent
Both intents handle the user input and give response. If user’s input doesn’t match with any intent than fallback intent called.
Intent has four sections:
-
- Context
- Context is one of the most vital components of intent. It essentially controls the flow of the conversation. Names in the Context are not case sensitive. For example, you could add both xyz and XYZ as context, but it would be considered as same Intent.
- There are two types of Context:
- Input context: It should be matched with previously defined intent’s output context
- Output context: Setting up information for current intent with Lifespan.
- User says
- In this section, you can add example text that you expect the users to input.
- Two modes of User says:
- Template Mode: Contains entity references and cannot be annotated.
- Example Mode: Contains normal speech and can be annotated by linking to a word.
- Action
- Action determines exactly which intent has been triggered by the user’s input. It can have certain parameters that extract information from user’s requests and will appear in JSON format.
{“action”:”action_name”}
{“parameter_name”:”parameter_value”}
- Action determines exactly which intent has been triggered by the user’s input. It can have certain parameters that extract information from user’s requests and will appear in JSON format.
- Response
-
- It is just a simple message that will make for the reply to the user’s request. You can add up to 10 sequential messages to your agent and it will choose any random response from them.
-
- Context
We will discuss more on that later.
-
-
- To create a new intent, click on plus (+) icon in the menu on left, beside the label Intents or select Intents and click CREATE INTENT button on the top right side.
- Enter intent’s name, and choose any user expression in User Says section, and add a response appropriate for it. Don’t forget to save it.
- For example, I created an intent named FirstIntent with some requests and responses. We can check it in the right side panel “Try it now”.
-
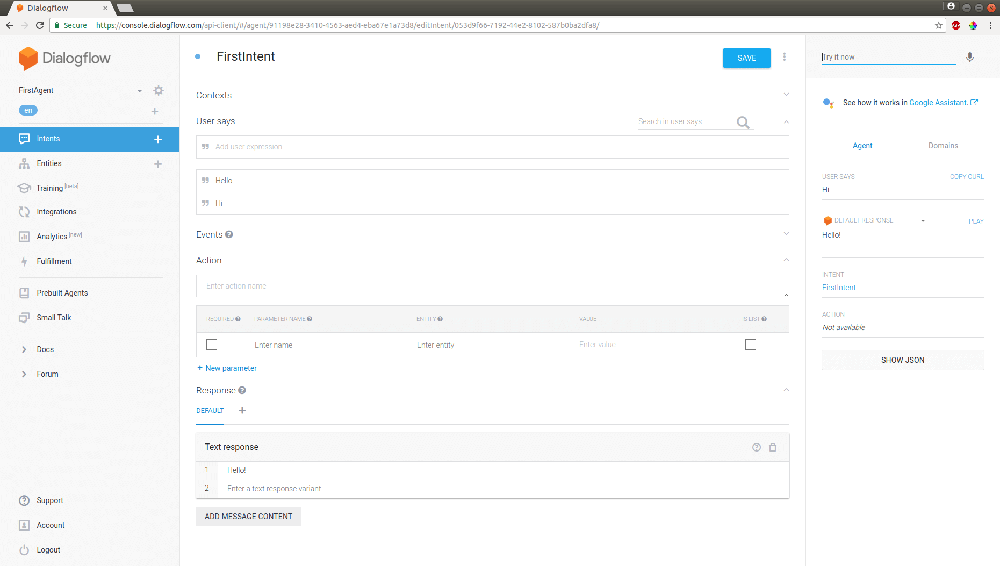
-
-
- You can see in the above image that I entered “Hi” and it responded with a “Hello!” which I already set before in my default response and this response you will get for whatever you entered in the User says section.
- If something you asked for is not available in your intent, then the default fallback intent is called.
-

Your first agent is now created. You can add as many inputs and responses as needed to make your agent more interactive. There are many more things you can do with your agent that will let you customize it into a complete suite of customer interaction chatbot. We will cover all that and more in our next tutorial. Until then, get cracking on your first bot and have fun experimenting with this compelling technology.